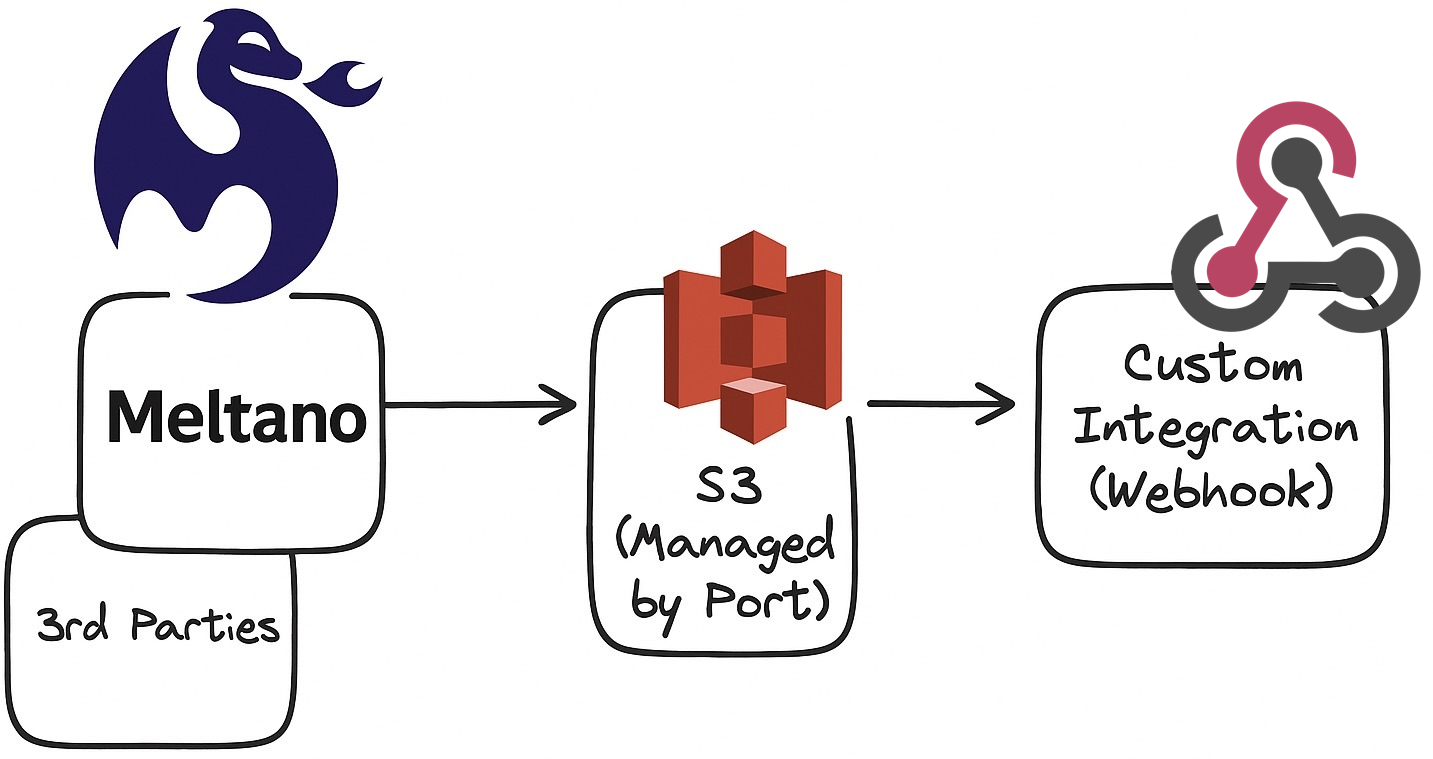
Ingest any data source into Port via Meltano, S3 and webhook
This guide will demonstrate how to ingest any data source into Port using Meltano, S3 and a webhook integration.
S3 integrations lack some of the features (such as reconciliation) found in Ocean or other Port integration solutions.
As a result, if a record ingested during the initial sync is later deleted in the data source, there’s no automatic mechanism to remove it from Port. The record simply won’t appear in future syncs, but it will remain in Port indefinitely.
If the data includes a flag for deleted records (e.g., is_deleted: "true"), you can configure a webhook delete operation in your webhook’s mapping configuration to remove these records from Port automatically.
Prerequisites
-
Ensure you have a Port account and have completed the onboarding process.
-
This feature is part of Port's limited-access offering. To obtain the required S3 bucket, please contact our team directly via chat, Slack, or e-mail, and we will create and manage the bucket on your behalf.
-
Access to an available Meltano app - for reference, follow the quick start guide, or follow the following steps:
- shell
-
Install python3
brew install python3 -
Create a python virtual env:
python -m venv .venv
source .venv/bin/activate -
Install meltano & follow installation instructions
pip install meltano -
Change to meltano project
cd <name_of_project>
Meltano setup
Refer to this GitHub Repository to view examples and prepared code sample for various integrations.
To integrate any data source supported by Meltano into Port, you will need to:
-
Set up the Meltano S3 loader (Only once):
Meltano provides detailed documentation on how to generate/receive the appropriate credentials to set the s3-target loader. Once the appropriate credentials are prepared, you may set up the meltano extractor:
- shell
-
Navigate to your meltano environment:
cd path/to/your/meltano/project/ -
Install the source plugin you wish to extract data from:
meltano add loader target-s3 -
Configure the plugin using the interactive CLI prompt:
meltano config target-s3 set --interactiveOr set the configuration parameters individually using the CLI:
# required
meltano config target-s3 set cloud_provider.aws.aws_access_key_id $AWS_ACCESS_KEY_ID
meltano config target-s3 set cloud_provider.aws.aws_secret_access_key $AWS_SECRET_ACCESS_KEY
meltano config target-s3 set cloud_provider.aws.aws_bucket $AWS_BUCKET
meltano config target-s3 set cloud_provider.aws.aws_region $AWS_REGION
# recommended
meltano config target-s3 set append_date_to_filename_grain microsecond
meltano config target-s3 set partition_name_enabled true
meltano config target-s3 set prefix 'data/'
-
Set up the Data Source extractor (Once per data source you wish to integrate):
Meltano provides detailed documentation on how to generate/receive the appropriate credentials to set each extractor, as well as alternate implementation options. Once the appropriate credentials are prepared, you may set up the meltano extractor:
- shell
-
Navigate to your meltano environment:
cd path/to/your/meltano/project/ -
Install the source plugin you wish to extract data from:
meltano add extractor <extractor-name> -
Configure the plugin using the interactive CLI prompt:
meltano config <extractor-name> set --interactive -
[Optional] - Some extractors can be tested using this command:
meltano config <extractor-name> test
-
Set up the Connection between the extractor and destination
In this step you will be able to define what data will be ingested and to which webhook integration in Port.
First, we will first create a specific target-s3 for the webhook we created:
meltano add loader target-s3-X --inherit-from target-s3
meltano config target-s3-X set prefix data/<WEBHOOK_URL>
meltano config target-s3-X set format format_type jsonl
Running the connection:
meltano el <extract-name> target-s3-X
Stream selection
Select streams (by default - meltano will attempt to extract all available streams):
meltano select <extractor-name> --list
meltano select <extractor-name> <stream-name>.<stream-field>
Discoverable Taps
Some taps are built with the discover capability, which lets you extract the stream schema for dynamical data sources, such as databases.
This is useful in controlling which data will be extracted from these taps, to discover a schema:
meltano invoke <extractor-name> --discover > extract/catalog.json
This will enable you to manually alter the catalog file to manage stream selection.
A common use-case, for example, is to limit the catalog to a specific schema, using jq:
jq '{streams: [.streams[] | select(.tap_stream_id | startswith("<SCHEMA_NAME>-"))]}' extract/catalog.json > extract/filtered-catalog.json
And setting the loader to use this catalog in the configuration file using the catalog extra field, for example:
  - name: tap-athena
    variant: meltanolabs
    pip_url: git+https://github.com/MeltanoLabs/tap-athena.git
    catalog: extract/athena-filtered-catalog.json
Data model setup
Figure out the target schema and mapping
To define the data model, you will need to know the schema of the data you want to ingest.
If you are unsure about the schema that the connector extracts, you can always set up the connection, and during the stream selection step, review the expected schema.
Alternatively, you can set up the connection and start the sync, then download the extracted files from S3, review them, and construct the appropriate blueprints and mappings.
If you set up a connection to S3 before setting the target blueprints and mappings, you will have to execute a "resync" after the resources in Port have been properly set up.
To download the extracted S3 files:
- AWS CLI
- Python (Boto3)
-
Install AWS CLI: Download and install the AWS CLI from AWS’s official page.
-
Configure Your Credentials: Run the command below and input your
ACCESS_KEY,SECRET_KEY, andregion:
aws configure
Alternatively, you can set the environment variables AWS_ACCESS_KEY_ID, AWS_SECRET_ACCESS_KEY, and AWS_DEFAULT_REGION.
- Download Files from S3: Use the following command, replacing the placeholders with your bucket name and file prefix:
aws s3 cp s3://<bucket-name>/<file-prefix> ./local-folder --recursive
for example:
aws s3 cp s3://org-XXX/data/abc123/ ./my_extracted_data --recursive
This command copies all files that start with your specified prefix into the local folder (create it if needed).
Run the following command to install boto3 if you haven’t already:
pip install boto3
Copy and paste this code into a file (e.g., download_s3.py), replacing the placeholders with your actual details:
import boto3

# Initialize the S3 client with your credentials and region
s3 = boto3.client(
    's3',
    aws_access_key_id='YOUR_ACCESS_KEY_ID',
    aws_secret_access_key='YOUR_SECRET_ACCESS_KEY',
    region_name='YOUR_REGION'
)

bucket_name = 'your-bucket-name'
prefix = 'your/file/prefix/'  # Ensure this ends with '/' if you want a folder-like behavior

# List objects within the specified prefix
response = s3.list_objects_v2(Bucket=bucket_name, Prefix=prefix)

# Download each file found
for obj in response.get('Contents', []):
    key = obj['Key']
    # Define a local filename (you might want to recreate the directory structure)
    local_filename = key.split('/')[-1]
    print(f"Downloading {key} to {local_filename}...")
    s3.download_file(bucket_name, key, local_filename)
Execute your script from the terminal:
python download_s3.py
Once the files are in your local device you can use your preferred text editor to review it's content and construct the appropriate blueprints and mappings for your data.
Create blueprints
Once you have decided on the desired blueprints you wish to set up, you can refer to the blueprint creation docs to set them up in your account.
Create webhook integration
Once you have decided on the mappings you wish to set up, you can refer to the webhook creation docs to set them up in your portal.
It is important that you use the generated webhook URL when setting up the Connection, otherwise the data will not be automatically ingested into Port from S3.
Troubleshooting
Issues with Meltano->S3 integration
Meltano provides detailed logs available through the web application on currently running sync processes as well as historical ones.
After a successful sync has completed, you will be able to see how long ago it was executed, and how many records were loaded to S3 in every stream.
To further diagnose issues in case of a failed operation, you may set the log_level to DEBUG when running meltano commands:
meltano --log-level=debug ...
Meltano Error - Package <plugin-name> requires a different Python...
If the Python version you are using in your environment is not compatible with the version required to run a specific plugin, you can use the "python" plugin parameter to direct meltano to use a specific Python binary file. This can be done either before the installation, by adding the --python argument:
meltano add <plugin-type> <plugin-name> --python /path/to/python3.X
Or by adding the python field to the meltano.yaml, for example:
plugins:
  loaders:
  - name: <plugin-name>
    python: /path/to/python3.X
    config:
      X: Y
More info in Meltano's settings reference
Issues with S3->Port ingestion
If everything in Meltano is working properly, and you don't see the data in your Port account, you can follow these steps to diagnose the root cause:
Issues in the Webhook
-
Navigate to Data Sources page in your port account.
-
Locate the Webhook integration you have set for the ingestion, and click on it.
-
In the pop-up interface, under "Add test Event" click on "Load latest event".
-
You should now see an example event that was received from the ingestion pipeline (in case you don't - scroll down to the below section in this guide: Data in S3 is not propagating to Port).
-
Scroll down to the section "Test Mapping" and click on the "Test Mapping" button at the bottom of the pop-up interface.
You should see the result of the mapping applied on the latest event that was received by the webhook URL in the text box above the "Test Mapping" button.
If you encounter a jq error - it means you have a syntax error or the source's schema does not match the mapping you have set and you will need to adjust the mapping properly.
If you encounter a JSON document list, it means the mapping is working properly, but it could be that the filters you have set in it all result in "false" (which means no entity will be created).
In this case you will need to look over the appropriate element in the document (with the relevant blueprint for the loaded event) and adjust the mapping so that the "filter" field will result to "true".
Issues in the blueprint definition
-
Navigate to the Data Sources page of your port account.
-
Locate the webhook integration you have set for the ingestion, and click on it.
-
In the pop-up interface, in the top pane menu click on "Audit Log".
-
You can now browse for issues in ingestion of specific entities in the audit log, or apply a filter where Status != "Success".
If any entities were created but failed to ingest, you will see an indicative error that may lead you to the issue in the blueprint definition.
Data is not propagating from S3 to Port
If you're sure the Meltano integration is working properly, there are no records in the Audit Log, and the "Load latest event" button does not produce an event in the corresponding box, there might be an issue with the pipeline set up by Port.
In this case, contact us using chat/Slack/mail to support@getport.io and our support team will assist in diagnosing and solving the issue.